You've been designing business cards with a white border around the edge for three years. It's time we talked.
By Someone Who Has Seen Your Business Cards · 5 min read
Let's set the scene. You've just designed your first-ever business card in Canva. It's got a bold navy background, your name in a font called "Bebas Neue" that you found at 11pm, and a little coffee cup icon because you're a creative. You hit export, send it to the printer, and two weeks later receive a stack of cards with a suspicious white border running around every single edge.
You stare at them. They stare back. You consider pivoting to a career in agriculture.
This, dear Canva pro, is what happens when you don't understand bleed. Welcome to the article that will change your life — or at least save you $47 in reprinting costs.
What even is "bleed"?
Bleed is not, as you may have briefly feared, a metaphor for how the printer feels about your design choices. It's actually very simple: when you print something and cut it to size, the cutting machine is not a robot surgeon. It wobbles. It drifts. It has bad days.
To account for this mechanical imprecision, you extend your background colour and images beyond the edge of your design by a few millimetres — typically 3mm. That extra zone is called the bleed. When the printer cuts through it, even if the blade wanders slightly, you still get a clean, colour-to-the-edge result instead of a ghostly white sliver of paper screaming "this person did not add bleed."
"Think of bleed like the hem allowance on a skirt. You add extra fabric you don't expect to keep, purely so the final cut lands perfectly. Except in printing, there's no seamstress — just a large guillotine."
Standard bleed is 3mm on all sides for most print products. Some large-format printers want 5mm. Your local print shop's website will tell you. Read it. It took them 20 minutes to write that page specifically to save you this exact problem.
And trim marks? Those little corner lines?
Trim marks — also called crop marks — are the tiny lines that appear at the corners (and sometimes the sides) of your print file. They tell the cutting machine exactly where to cut. They are not part of the design. They do not print on your final card. They exist purely as instructions for the blade.
Imagine handing someone a piece of paper and writing "CUT HERE" with a dotted line. Trim marks are the professional, less chaotic version of that.
Here's the spatial logic, because it actually helps to see it in your head:
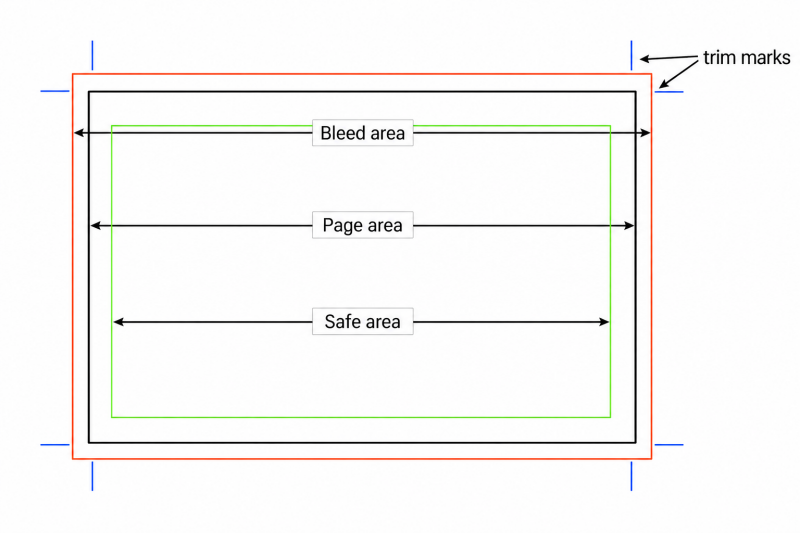
Three zones. Outer = bleed (gets cut off). Middle = trim line (where the cut happens). Inner = safe zone (where your actual content lives and nothing gets guillotined accidentally).
Why Canva makes this confusing
Canva is wonderful. Canva is the reason millions of people who are not graphic designers are producing work that looks like they might be. But Canva's default setup is sized to the finished dimensions — it does not automatically add bleed. This is technically correct behaviour, and also the source of immense, industry-wide suffering.
When you design a 90mm × 55mm business card in Canva, your canvas is 90mm × 55mm. Your beautiful navy background? It ends at the edge. When the printer cuts — even a millimetre off — you get white. Cold, judgemental white.
The fix is boring and easy and you'll be annoyed it wasn't obvious: set your canvas to 96mm × 61mm (adding 3mm bleed on each side), extend your background fully to the new edges, and keep all your text and logos 3–5mm inside the original boundary. Canva Pro users can also enable bleed guides directly in the print settings. When exporting, choose PDF Print and tick "crop marks and bleed" if the option appears.
The three-second rule for any print job
Before you export anything meant for a physical printer: does my background colour touch all four edges of the canvas? If yes, you probably have bleed. If you see white canvas around your design, you definitely do not. Fix it before you pay for it.
A brief moment of compassion
None of this is taught anywhere. Design schools mention it. Everyone else learns it the first time they receive a printed product that looks slightly wrong and cannot immediately articulate why. The white border problem has humbled professional designers, marketing managers, and at least one person who runs a very successful Etsy shop selling printable wall art who shall remain nameless.
You know now. Go extend your backgrounds. Your printer — a machine incapable of feelings — will cut straighter for it. Or it won't, because it wobbles, which is exactly why you added the bleed in the first place.
Add comment
Comments